Battery switch on travel trailer function is crucial for managing your RV’s power. Understanding how your battery switch works is key to preventing dead batteries, maximizing your power sources (like solar panels and shore power), and avoiding costly repairs. This guide will walk you through the different types of switches, troubleshooting common problems, and essential safety tips, making sure you’re confident in managing your travel trailer’s electrical system.
We’ll cover everything from basic single-switch setups to more advanced systems, explaining the pros and cons of each. We’ll also dive into how the switch interacts with various charging systems, including alternators, solar panels, and shore power, ensuring you understand the complete power flow within your RV. Get ready to become a battery switch expert!
Battery Switch Types in Travel Trailers

Choosing the right battery switch for your travel trailer is crucial for managing power and preventing issues. Different switches offer varying levels of control and complexity, impacting both your setup and budget. This section will detail the common types, their advantages, disadvantages, and wiring.
Battery Switch Types
Travel trailers typically utilize one of three main battery switch types: single battery switches, dual battery switches, and battery isolators. Each offers a unique approach to managing your trailer’s battery power.
Single Battery Switch
A single battery switch is the simplest option, providing on/off control for a single battery. This is suitable for trailers with only one battery powering the house systems.
| Feature | Description |
|---|---|
| Type | On/Off switch for a single battery |
| Installation Complexity | Very simple; usually involves connecting two wires. |
| Cost | Low |
| Pros | Simple, inexpensive, easy to install. |
| Cons | Only controls one battery; no isolation of batteries. |
| Component | Wire Connection |
|---|---|
| Battery Positive (+) | Connects to the switch’s input. |
| Switch Output (+) | Connects to the trailer’s 12V system. |
| Battery Negative (-) | Directly connected to the trailer’s negative bus bar. |
Dual Battery Switch
A dual battery switch allows for independent control of two batteries. This is common in trailers with a house battery and a starting battery. It allows for selecting which battery powers the house systems or to connect both in parallel.
| Feature | Description |
|---|---|
| Type | On/Off switch for two batteries; typically allows for both batteries to be connected together or individually selected. |
| Installation Complexity | Moderate; requires careful wiring to ensure correct functionality. |
| Cost | Moderate |
| Pros | Independent control of two batteries; allows for parallel connection for increased capacity. |
| Cons | More complex installation than a single switch. |
| Component | Wire Connection |
|---|---|
| Battery 1 Positive (+) | Connects to the switch’s input for battery 1. |
| Battery 2 Positive (+) | Connects to the switch’s input for battery 2. |
| Switch Output (+) | Connects to the trailer’s 12V system. |
| Battery 1 Negative (-) | Directly connected to the trailer’s negative bus bar. |
| Battery 2 Negative (-) | Directly connected to the trailer’s negative bus bar. |
Battery Isolator
A battery isolator automatically manages power between two batteries, preventing one from draining the other. This is ideal for maintaining the starting battery’s charge while running house systems off the house battery. It uses diodes to allow current to flow in one direction only.
| Feature | Description |
|---|---|
| Type | Automatic switch that prevents battery drain; allows current to flow in one direction. |
| Installation Complexity | Moderate; requires understanding of electrical flow and diode function. |
| Cost | Moderate to High |
| Pros | Automatic operation; prevents one battery from draining the other. |
| Cons | Can introduce voltage drop; slightly more complex installation. |
| Component | Wire Connection |
|---|---|
| Starting Battery Positive (+) | Connects to one input of the isolator. |
| House Battery Positive (+) | Connects to the other input of the isolator. |
| Isolator Output (+) | Connects to the trailer’s 12V system. |
| Starting Battery Negative (-) | Directly connected to the trailer’s negative bus bar. |
| House Battery Negative (-) | Directly connected to the trailer’s negative bus bar. |
Function of the Battery Switch
The battery switch in your travel trailer is a crucial component of its electrical system, acting as a central on/off control for your house batteries. It’s essentially the main power switch for all the 12-volt appliances and systems in your RV, allowing you to completely disconnect them from the batteries when not in use. This simple device plays a significant role in preventing unwanted battery drain and ensuring the longevity of your batteries.The battery switch manages the power flow between your travel trailer’s house batteries and the charging system (either from your tow vehicle or shore power).
When the switch is in the “on” position, it completes the circuit, allowing power from the batteries to flow to the various 12-volt devices within the trailer, such as lights, water pump, and refrigerator. Simultaneously, it allows charging current from the external sources to reach and replenish the batteries. Conversely, when the switch is “off,” it breaks the circuit, completely isolating the house batteries from the trailer’s electrical system, preventing any drain even when the trailer is parked for extended periods.
So, you’re planning a trip? Awesome! Don’t forget travel insurance! Seriously, it’s a lifesaver. Check out Aon travel insurance for comprehensive coverage. They’ve got options for everything from lost luggage to medical emergencies. And if you’re worried about specific medical needs, Aon travel insurance also offers plans that cater to pre-existing conditions, giving you peace of mind so you can focus on enjoying your vacation.
Get a quote today and travel worry-free!
Battery Switch and Prevention of Battery Drain
A common problem with RVs is the slow, insidious drain on the house batteries caused by parasitic draws from even seemingly small devices or faulty wiring. These small drains might not be noticeable in the short term, but over several weeks or months, they can completely deplete your batteries, leaving you stranded without power. The battery switch is your primary defense against this.
By turning the switch to the “off” position, you completely cut off power to all 12-volt systems, effectively preventing any parasitic drain, even from the smallest of culprits. This ensures your batteries retain their charge for extended periods of non-use, ready for your next adventure. For example, a small LED light left on unintentionally can drain a battery over a few weeks.
With the battery switch off, this won’t happen.
Troubleshooting Common Battery Switch Issues
Your travel trailer’s battery switch is a crucial component, controlling the flow of power to your house batteries. Problems with this switch can leave you stranded without lights, appliances, or even the ability to start your trailer’s tongue jack. Understanding common issues and how to troubleshoot them is key to a smooth camping experience.Troubleshooting a malfunctioning battery switch involves a systematic approach, combining visual inspection with voltage testing.
Remember safety first! Always disconnect the negative battery terminal before working on any electrical components.
Visual Inspection of the Battery Switch
Begin by carefully examining the battery switch itself. Look for obvious signs of damage, such as cracks in the plastic housing or corrosion around the terminals. Corrosion is a frequent culprit, building up over time and hindering the flow of electricity. Pay close attention to the connection points where the battery cables attach to the switch. Loose connections are another common problem that can prevent proper operation.
A simple visual check often reveals the source of the problem. If you see corrosion, you’ll need to clean it thoroughly using a wire brush and baking soda solution. If connections are loose, tighten them securely.
Voltage Testing Procedures
After the visual inspection, use a multimeter to test the voltage at various points in the circuit. First, check the voltage directly at the battery terminals. This confirms the batteries are charged and functioning correctly. Next, measure the voltage at the input and output terminals of the battery switch. A significant voltage drop between these points indicates a problem within the switch itself.
For example, if your batteries read 12.6 volts, but the output side of the switch reads only 10 volts, you likely have a faulty switch or significant corrosion within the connections. If the voltage is low at the battery terminals, the problem likely lies with the batteries themselves, not the switch. Remember to always observe proper safety precautions when using a multimeter.
Preventative Maintenance Strategies
Regular maintenance is key to extending the life of your battery switch and preventing problems.
- Regular Cleaning: Inspect the switch and its connections at least twice a year, cleaning away any corrosion with a wire brush and baking soda paste. This prevents the build-up of corrosive materials that can impede electrical flow and damage the switch.
- Tighten Connections: Periodically check and tighten all connections to ensure a secure and reliable electrical path. Loose connections are a major source of problems and can lead to overheating and potential fire hazards.
- Protective Coating: Apply a dielectric grease to the terminals and connections after cleaning. This helps prevent future corrosion and keeps the connections clean and dry. Dielectric grease is specifically formulated for electrical applications and won’t conduct electricity.
- Switch Replacement: If you notice recurring problems or significant corrosion despite regular cleaning, consider replacing the switch. A new switch will ensure optimal performance and eliminate potential safety hazards. Replacing a switch is relatively inexpensive compared to the inconvenience and potential costs associated with a battery system failure.
Battery Switch and Charging Systems: Battery Switch On Travel Trailer Function
Your travel trailer’s battery switch is the central control point for your power system, but its role extends far beyond simple on/off functionality. It significantly impacts how your batteries charge from various sources, influencing both charging efficiency and battery lifespan. Understanding this interaction is crucial for maximizing your off-grid capabilities and maintaining your battery bank’s health.The battery switch acts as a gatekeeper, determining which charging sources can access your batteries and, in some cases, which battery banks receive power.
This control is particularly important when managing multiple battery types (like lead-acid and lithium) with different charging requirements. Incorrect configuration can lead to overcharging, undercharging, or even damage to your batteries.
Alternator Charging and the Battery Switch
The alternator in your tow vehicle provides a primary charging source when traveling. With the battery switch in the “on” or “both” position (depending on your switch configuration), the alternator’s output can flow to your house batteries through a charging relay or converter. This ensures that your batteries receive a charge while driving, extending your off-grid time. However, if the switch is off, the alternator will not charge your house batteries.
Some systems incorporate a smart charging relay that only connects the alternator to the batteries when the engine is running and the alternator output is sufficient, preventing overcharging or draining the vehicle’s battery.
Solar Panel Charging and the Battery Switch
Solar panels offer a sustainable charging solution for your travel trailer batteries. Similar to alternator charging, the battery switch dictates whether the solar charge controller can deliver power to your house batteries. If the switch is off, the solar panels will not charge the batteries, even if they’re producing power. It’s important to note that most solar charge controllers have built-in safeguards to prevent overcharging, regardless of the battery switch position.
However, the switch provides an additional layer of control and safety.
Shore Power Charging and the Battery Switch
When connected to shore power (AC electricity at a campground), a converter/charger transforms AC power into DC power to charge your batteries. The battery switch’s role here is less critical than with alternator or solar charging because the converter/charger typically includes its own internal circuitry to manage the charging process. However, some systems may use the battery switch to isolate the batteries from the converter/charger if desired, offering an additional safety measure.
Again, the position of the switch will directly affect whether or not the batteries receive charge from shore power.
Battery Switch and Different Battery Types
Different battery chemistries (lead-acid and lithium) have distinct charging requirements. Lead-acid batteries are more tolerant of slight overcharging, while lithium batteries are extremely sensitive and require precise voltage and current control to prevent damage. A properly configured battery switch, combined with a compatible charge controller, is vital to ensure that each battery type receives the appropriate charging profile. Incorrect settings can lead to reduced lifespan or irreversible damage.
For example, using a lead-acid charger on lithium batteries can cause a fire.
Power Flow Flowchart
This flowchart illustrates the power flow through a typical battery switch setup during different charging scenarios. Assume a system with one battery bank and a three-position switch (Off, Battery, Both):[Imagine a flowchart here. It would start with a box labeled “Charging Source” with three branches: Alternator, Solar Panel, Shore Power. Each branch would lead to a diamond shape representing the Battery Switch position (Off, Battery, Both).
So, you’re planning a trip? Awesome! Don’t forget travel insurance – it’s a lifesaver. Check out Aon travel insurance for comprehensive coverage. They offer a wide range of plans, so you can find one that fits your needs and budget. Speaking of needs, if you’re going somewhere with potential health risks, consider the added security of Aon travel insurance , which often includes medical evacuation and emergency medical services.
Getting insured is a small price to pay for peace of mind, right?
Each outcome (Off, Battery, Both) would lead to a box representing the final destination: “Batteries Charging” or “Batteries Not Charging”. The “Batteries Charging” box would have a further branch indicating the battery type (Lead-Acid or Lithium) leading to another box indicating the appropriate charging parameters (e.g., voltage, current). A final box would indicate “Battery Bank”.]This illustrates the crucial role the battery switch plays in directing power flow and ensuring the correct charging process for your batteries.
A misconfigured switch can interrupt charging or, worse, damage your batteries.
Upgrading or Replacing a Battery Switch
Upgrading or replacing your travel trailer’s battery switch can significantly improve your camping experience, offering better power management and potentially extending the life of your batteries. This section will guide you through the process, from comparing different switch types to safely installing a new one. Remember, working with electrical systems requires caution; if you’re uncomfortable, consult a qualified RV technician.Choosing the Right Battery Switch: Several factors influence the selection of a new battery switch.
Consider your power needs, budget, and desired features.
Battery Switch Brands and Models
The market offers a variety of battery switches, each with its own set of features and price points. Popular brands include Blue Sea Systems, Perko, and Progressive Dynamics. Blue Sea Systems is known for its robust construction and reliable performance, often featuring multiple circuits and LED indicators. Perko switches are a cost-effective option, suitable for basic setups. Progressive Dynamics offers switches integrated with their charging systems, providing comprehensive power management solutions.
Specific models vary widely, from simple single-battery switches to complex multi-bank systems with remote control capabilities. Consider your trailer’s electrical setup and future expansion plans when making your choice. For instance, a larger trailer with multiple appliances might benefit from a switch with more circuits.
Replacing a Faulty Battery Switch, Battery switch on travel trailer function
Replacing a battery switch is a relatively straightforward process, but safety is paramount. Always disconnect the negative battery terminal before beginning any work.
- Safety First: Disconnect the negative battery cable. This prevents accidental shorts and protects you from electrical shock.
- Identify Wiring: Carefully trace and label all wires connected to the old switch. Take photos for reference. Note the positive and negative connections, as well as any auxiliary circuits.
- Remove the Old Switch: Unscrew the old switch from its mounting location. Be mindful of any securing brackets or clips.
- Install the New Switch: Mount the new switch in the same location using the appropriate screws or fasteners. Ensure it’s securely fastened and level.
- Reconnect the Wiring: Carefully reconnect the wires to the new switch, matching the labels and photos you created earlier. Double-check each connection to ensure accuracy.
- Test the System: Reconnect the negative battery cable. Test the switch to ensure all circuits function correctly. Check your lights, appliances, and other electrical components.
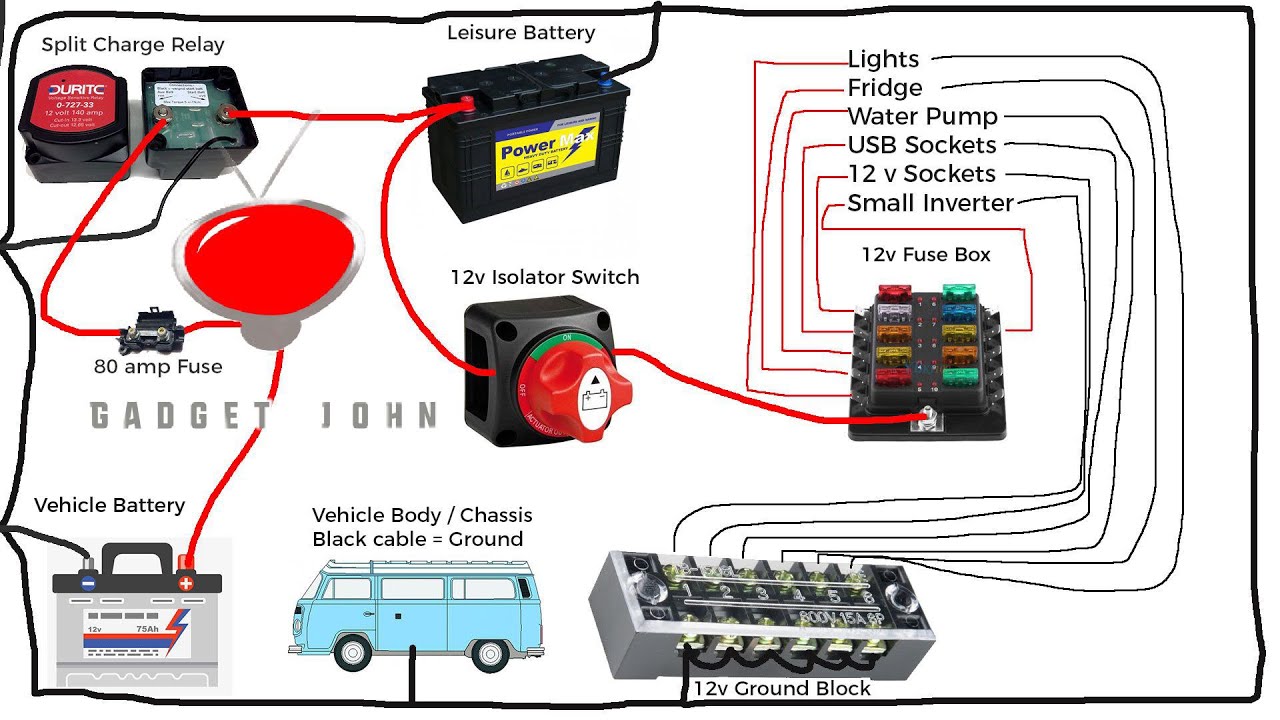
A simple wiring diagram would show the battery’s positive terminal connected to the switch’s input, the switch’s output connected to the trailer’s positive bus bar, and the negative terminal directly connected to the trailer’s negative bus bar. Individual circuits from the bus bar would then branch out to the various appliances. A more complex system might involve multiple batteries and charging systems, requiring a more detailed diagram.
Upgrading to an Advanced Battery Switch System
Upgrading to a more advanced system often involves adding a battery monitor. A battery monitor provides real-time data on battery voltage, current, and state of charge, allowing for better power management and preventing over-discharge. This is particularly beneficial for larger trailers or those with significant power demands. Some advanced switches incorporate battery monitors directly into their design.
Other systems allow for the integration of a separate battery monitor via shunt or other connection methods. The choice depends on your budget and technical skills. Adding a battery monitor allows for proactive battery maintenance, preventing premature failure and maximizing the lifespan of your investment. For example, a monitor can alert you to a low voltage condition, preventing damage to sensitive electronics.
Mastering your travel trailer’s battery switch is a game-changer for any RVer. By understanding its function, troubleshooting potential issues, and implementing proper safety precautions, you can ensure a smooth and reliable power supply for all your adventures. Remember to perform regular maintenance and don’t hesitate to consult a professional if you encounter any problems beyond your expertise. Happy travels!
FAQ Explained
What happens if I leave my battery switch on all the time?
Leaving your battery switch on constantly can drain your house batteries if there’s no charging source active. This is especially true if you have accessories drawing power even when not in use.
Can I use a lithium battery with any battery switch?
Not necessarily. Some switches aren’t designed for the higher voltage and charging characteristics of lithium batteries. Check your switch’s specifications and consider a lithium-compatible switch if needed.
How often should I inspect my battery switch?
Regularly inspect your battery switch for corrosion, loose connections, and any signs of damage at least once a year, or more frequently if you use your RV extensively.
What’s the difference between a battery switch and a battery isolator?
A battery switch manually connects or disconnects batteries. A battery isolator automatically connects and disconnects based on charging system voltage. Isolators prevent battery drain by preventing the house batteries from draining the vehicle’s battery.
